Recording Classical Guitar: Part 2 – Microphone Positioning

Hi folks, following on from the first in a three part guest post from Rick Alexander (here’s the LINK in case you missed it) on how to approach a recording set-up, I have a fabulous post for you from Rick on microphone positioning for optimum sound capture during the recording process.

Over to you Rick!

Recording Classical Guitar: Part 2 – Microphone Positioning

Microphone positioning is one area where recording becomes more of an art than a science.   You do need to experiment in order to get the best results. 

guitar 6

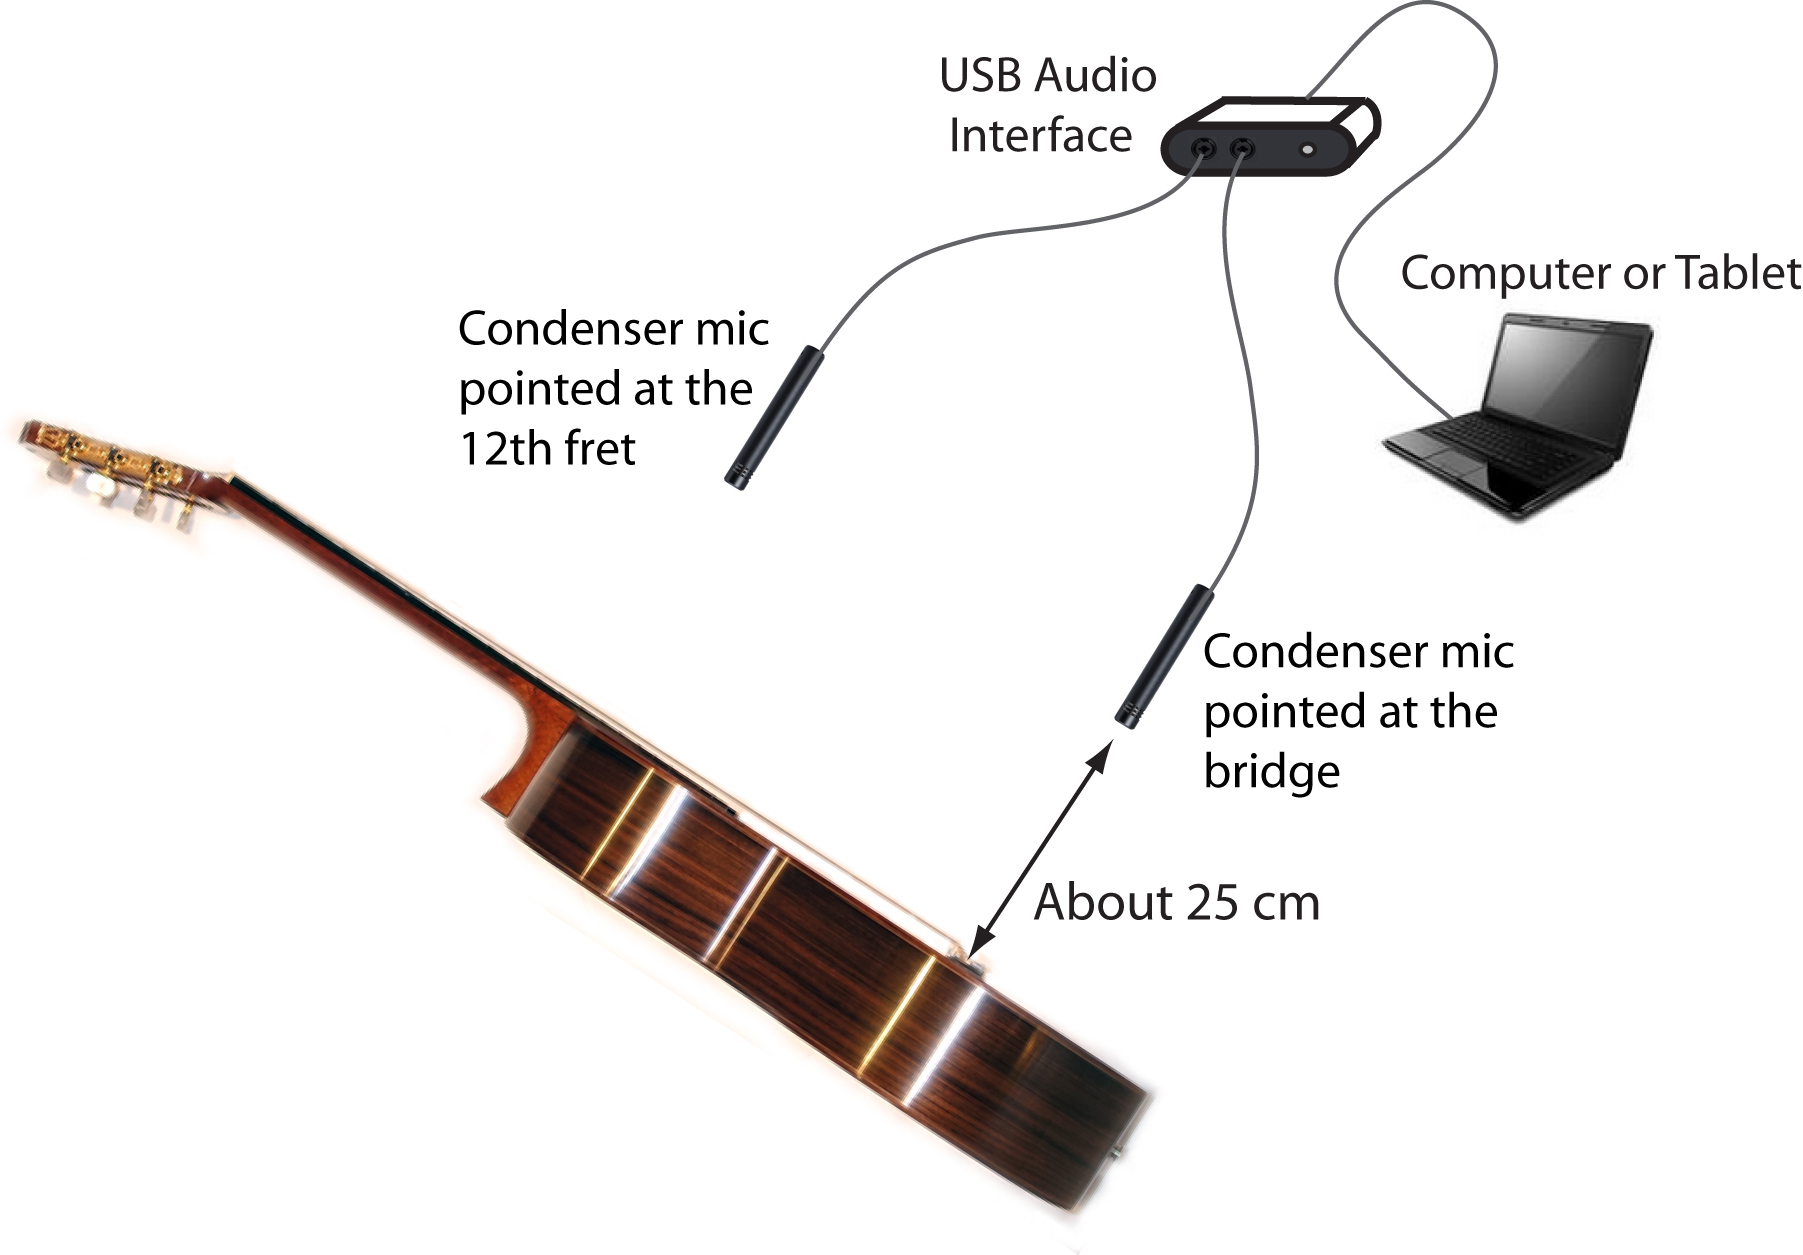
Figure 1 – A mic set up for stereo recording (used for example 1)

Figure 1 above shows a typical setup for stereo recording (see more on stereo vs mono below). Pointing one mic at the bridge, one mic at the 12th fret works well. As noted in part 1, you won’t want the mics too close to the guitar or you’ll get too much bass. I usually have around 25 to 35cm from the mic tip to the guitar. If you have the mics further away you’ll be picking up more and more of the sound reflections from your room’s walls and floor. Unless your room is acoustically optimised you probably don’t want this. Also, an advantage of having the microphones fairly close to the guitar is that this will help the guitar’s sound to outweigh any sound from traffic etc. from outside.

Here is a stereo recording I’ve made with the setup shown in Figure 1.

The microphones I used are Neumann KM184s and the audio interface a MOTU 828 mk3. The guitar is a 1995 Carson Crickmore with a traditionally braced spruce top. The strings are Hannabach high tension Silver Special basses and Carbon trebles (which are fairly bright). The music is the introduction of my piece “Bellbrae” from my CD “Fine Light”. I’ve put the right mic signal, from the listener’s point of view, on the right channel and the left mic on the left channel. (Putting each mic’s signal totally on one channel gives the widest stereo image.) Note that this is a raw recording – I’ve done no adjustment except to adjust the levels of the left and right signals to about the same level and to fade the ending.

Angled mics

I sometimes put the mics perpendicular to the sound board of the guitar as in Figure 1. Alternatively, I angle the mics as in Figure 2, with the mics about 25cm from the guitar. Audio Example 2 is a recording I’ve made with the mics setup as in Figure 2. I prefer the sound of example 2 but the difference isn’t large.

guitar 6

Figure 2 – Angled mic  position for stereo recording (used for example 2)

It’s also worthwhile experimenting with which strings you point at. I usually aim the mic roughly at the 3rd and 4th strings. You don’t need to be too precise but, for example, I think you’d start noticing too much bass if you aimed as far off centre as the 6th string.

If you have a hard wooden floor I’d recommend putting a rug under yourself and the mic stands in order to reduce the guitar sound reflecting from the floor to the mics.

Finally, if you’re recording using a computer I’d suggest setting up so that you can point the back of the mics in the direction of the computer so as to reduce the level of computer noise recorded.

Here’s a good YouTube clip where the presenter demonstrates the effect of changing microphone positions for steel string guitar recording: https://www.youtube.com/watch?v=q2nNXnCBKaw

Mono vs Stereo Recording

You might well ask: why stereo? We only want to record one guitar after all. Also, you’ll often see concert performers only using one mic on their guitar.

But you’ll find that if you record a single guitar in stereo you’ll get a much more realistic sounding result. Especially when listening on headphones. Audio Example 3 here illustrates the difference. The example has a short section of audio in mono then a short section in stereo followed by longer mono and stereo sections. I’ve used the setup in Figure 2 for the stereo section and the mono section is just the right channel from the stereo recording.

I did also try using the bridge mic for this mono example but thought the neck mic sounded better.

Mic Stands

K & M make good quality mic stands. They have a small stand, K&M 25950, which is particularly useful for classical guitar recording. http://www.sweetwater.com/store/detail/KM25950 Using this stand lets you avoid having the large boom of a typical mic stand cluttering up your room.

Audio Interfaces

In the next post I’ll discuss options for the audio interface used to interface the microphones to your computer.

Recording Classical Guitar: Part 1 – A Recording Setup

Morning folks!

Those of you who read the blog frequently may recall the fabulous Rick Alexander – if not, or you’re relatively new around these parts check out these posts:

Q&A with Rick Alexander

* Album Review: Fine Light by Rick Alexander

* From Nylon to Steel and Back (a fantastic guest post that Rick wrote for the blog early last year)

Well, Rick has been kind enough to share his knowledge and experience of recording the classical guitar – how to get set up, gear and so on. And so much knowledge does he have that we have a little mini-series for you on the subject, and so for today and the next couple of Monday morning (AEST) posts I hand you over to Rick!!

Rick

Here you go folks. Thanks Rick!

Recording Classical Guitar: Part 1 – A Recording Setup – Plus Microphones

It’s now easier and cheaper than ever to make good quality recordings of your playing. In this series I’ve put together some tips from my own experience of home recording over the past 18 years.

Why record yourself?

It’s a lot of fun: You get to hear back the results of the practice you’ve put in. Our guitars and our playing vary over time. It’s great fun and very satisfying to capture your guitar sounding its best with your best playing.

Recording yourself can help you hear more clearly how you’re playing. Sometimes when you’re working hard on a piece you don’t hear it as others do. Listening back to a recording after a gap of a few days can help you hear problems in your playing. And help you hear what’s working well.

If you write your own music you can record as a piece of music develops over time.

It’s a way to share your playing. This is one of the most satisfying aspects for me.

A recording setup for classical guitar

Figure 1 shows a typical setup for recording solo classical guitar. The main components are:

  • Two condenser microphones for stereo recording (plus mic stands).
  • A USB digital audio interface to digitize the analog signal from the microphones.
  • A computer or tablet to record to.
  • Recording software on the computer or tablet.
  • Plus you’ll need powered speakers or headphones to play back on. (Connected either to the computer or to the audio interface.)

Recording Classical Guitar - Part 1 - Fig 1 - 19-4-15

Figure 1 – Microphone Setup

Which factors affect the sound quality of your recording the most?

There’s a simple answer: the microphones and the microphone positioning have the largest effect. Next would be the room you’re recording in followed by the audio interface.

Microphones

Unfortunately it turns out that, like guitars, all microphones are not created equal!   Generally, the more you pay the better the sound quality.

Dynamic vs Condenser Microphones

There are two main types of microphone: Dynamic and Condenser. While the dynamic type is more rugged the condenser type reproduces high frequencies better. This better frequency response results in a more realistic sounding recording. The small diaphragm condenser type is generally considered the best for instrumental recording. http://homerecording.about.com/od/microphones101/a/mic_types.htm

A popular dynamic mic is a Shure SM57. US $99. http://www.sweetwater.com/store/detail/SM57

Examples of small diaphragm condenser mics are:

Behringer C-2: US$60 for a pair. http://www.sweetwater.com/store/detail/C2m

Rode M5: US$199 for a pair. http://www.sweetwater.com/store/detail/M5MP

Rode NT5: US $429 for a pair. http://www.sweetwater.com/store/detail/NT5

Shure SM81: US$700 for a pair. http://www.sweetwater.com/store/detail/SM81

and Neumann KM184. US $1600 for a pair. http://www.sweetwater.com/store/detail/KM184Pair

When buying a microphone ideally try to find a store which will let you try their microphones. In fact I’d recommend asking if you can take your guitar along to the store and make some test recordings.

I think you’ll find that the more expensive mics do generally sound better but very acceptable results can be had from mics in the few hundred dollar range per mic.

For my recent CD “Fine Light” I used Shure SM81 mics for ten tracks recorded at a recording studio and Neumann KM 184 mics for six tracks recorded at home. I haven’t tried the Rode or Behringer mics I’ve listed here but you’ll find positive reviews on the web. E.g. http://www.soundonsound.com/sos/feb14/articles/rode-m5.htm

Microphone Polar Pattern

Microphones vary in their sensitivity versus the angle of the sound source from the direction the microphone is pointing. This is called the microphone’s “polar pattern”. The most common polar pattern for microphones used for instrumental recording is the “cardioid” pattern for which the microphone is most sensitive straight ahead and sensitivity falls off to zero directly behind. The microphones I’ve listed above all have a cardioid polar pattern.

http://www.shure.co.uk/support_download/educational_content/microphones-basics/microphone_polar_patterns

Proximity effect

It’s an intrinsic feature of microphones with a cardioid polar pattern that their bass response is increased when the microphone is closer to the sound source. This is called the “proximity effect”. I’ve found that I need to position the mics maybe 25 to 35 cm from the guitar to get a natural sounding bass response.

Mic positioning

Now that you have some microphones the question is how to position them in order to get the best sound quality. In the next post I’ll talk about mic positioning.